Showing posts with label Witch Jars. Show all posts

Tuesday, November 09, 2010

100?! ALREADY?

 100 posts!
To celebrate: 8 pictures of the witches kitchen and 2 pictures from my display!
Thanks to those of you who come to my blog, you people are awesome. 

Image by Strublay

Image by Strublay

Image by Strublay

Image by Strublay

Image by Strublay

Image by Strublay

Image by Strublay

Image by Strublay

Image by Strublay

Image by Strublay

Thursday, November 04, 2010

Old books, Incense smoke, and Jars

Image by Strublay
I love this picture because of the incense smoke.

Pumpkins, Jars, and the Soul Cage.

Image by Strublay

Halloween Night, I love how you had to right up on him to see Beast. He's up there, by the door, you just can't see him from this angle. 

Witches Kitchen

Image by Strublay

Another from the Halloween night Still Life. 

Monday, November 01, 2010

The Trials and Tribulations: Halloween 2010

Image By Strublay

Well things went wrong. I found out that the building defect in my condo complex involved the overhangs, the drywall was so water damaged (Unsealed drywall outside........ even in vegas: WTF) that I couldn't hang any of the witch jars as planned. As such my display became much much simpler this year. 

Ah well.

Thats life.

Above is the sight that greeted my eleven trick or treaters (ELEVEN!! I had 2 last year!!! *Happy Dance*).
We kept the Door open as my friends and I enjoyed the evening, the night was in the 60's so we could keep all the doors and windows open with out freezing out like last year. 

Image by Strublay

Top To Bottom: Psycho, Scarz, Jacobs [PUMPKIN], Jack(Nightmare before Christmas), Jeffs Stitches.

Image By Strublay

Two-Face: Hyde

Image by Strublay

Little Giggle

Image by Strublay

Lloyds Souless.

Only had one this year..... thank god.

Image by Strublay

The Beast.

Image By Strublay

Tiny Terror, the Soul Cage, and the Witch Jars.

This was a wonderful evening, I didn't get my first ToT until WELL after sundown, and I had to send out my Husband to get more candy because we got more kids than we expected. 
I also still have a full bag of Smarties!
*Grin* Yummy!

I also got to see and hear something I never thought I could pull off. I was sitting fussing over my Guild Wars Halloween Event, when my comrades and I heard the sounds of kids whispering downstairs, I walked to the door and poked my head around the corner.
Several Women, in thier 30's I'd say, were cowering behind a 9-10 year old boy. They were arguing about which of the women would go up the stairs with the boy. When they noticed me they covered by saying that the boy was scared and they all thought that someone would jump out of the door and scare them. 
I got 30-somethings to hesitate, just for a second, like scared 8 year olds. 
Simple display, but it worked out wonderfully.

I went through and did a photo session, and I'll put those pictures out in time.

I hope everyones Halloween was as good as mine.

Now for some sleep... ah..... sleep.


Sunday, October 31, 2010

The Big Day

Today is the Day of Days, The High Holiday. 
The Reason this blog is here.

Halloween.

Carved 7 pumpkins and completed many of my final prep in the last few hours. 
The largest Pumpkin I carved was a 25 pounder, and his smile is nearly two and a half feet wide.
I also completed my second round of Witch Jars. This one is a round with Labels.
You see my witch likes to recycle. 

She takes the Labels from the smaller containers she purchases and sticks them on Jars she likes to use for storage, when she runs out of the component she puts the Jar in the pile of used Jars that are moldering in a corner of her abode. She doesn't like to throw them out.
They get REAL dirty after a while.

Image By Strublay

Image By Strublay

Image By Strublay
I had to have this one. Its a Lemonade Flavored Laxative. Makes me giggle.

Image By Strublay
I worked pretty hard to try to make the Labels and the outside remains match.
Glycerin is typically a clear liquid so I kept the jar very clear.

Image By Strublay
When I get Ideas from other Haunters I like to give credit.
I don't have a grave-yard, so no headstones. Labels For Jars and Potions and Herb Mixes have to work instead.
This year I am using a lot of witch Jars, so I'm giving credit to Rot for the idea.
"Monsieur Rot's Plant Animation Powder (DO NOT USE NEAR GRAVES!)" 
Shoulda' done it in French, but hey.

The more ideas I get from the Halloween Community, the more labels will bear the names of the community members who came up with the original idea.

Oh and this one smells awesome, because the plant animation powder stand-in is cinnamon, which has been rubbed on the glue prior to the glue drying.

Image By Strublay
The Rules of Halloween: hand out treats, and ALWAYS check your candy.
I hand out Full-size candy bars, this year with Owl Cards (Which essentially say: Happy Halloween, Brush Your Teeth! Visit My Blog and the Forum PLZ) with Clip art from The Graphics Fairy Blog.
See that on the Right??? 
YEAH.
SMARTIES.
It's my Back Up.
I HAND OUT SMARTIES AS MY BACK UP!
*Indignant Strublay* 
What'chu gonna do 'bout it?
Don't Hate. Smarties are awesome.
Haters.

Image By Strublay

The Eye of the Beast, freshly cut.

So Kids, Remember the Rules: Wear A Costume, Hand Out Treats, Always Check Your Candy, And NEVER Blow Out A Jack O Lantern.
May Your Day be filled with preperation and your evening filled with Fear. 
Above All Else: 

Have a Happy Halloween.
~~~~Madame Strublay~~~~

Tuesday, October 26, 2010

Let Hell Week Commence! And Introducing the Soul Cage.

Image By Strublay
I have a ton of Pumpkins, I have a ton of work to do, but I'm so psyched. Seriously. 

Image by Strublay

Introducing the Soul Cage, if your the observant type you'll notice I let it slip..... 
ah well.
The idea of the Soul Cage is that its essentially a hanging cage that holds a Ghost or Ghosts that rattles itself and makes noises. The spirit inside is held in by spells that glow creepily. 
This image is of a "draft", the final piece will be done in time for Halloween, and I'll have plenty of pictures of it coming up in the next few days. 

Image by Strublay

SO excited.
OMG.

Friday, October 15, 2010

Of rotting pumpkins, and another still life

So, we picked up pumpkins while returning from Knotts, and at the time all of the pumpkins looked sound.... 
But alas, I was wrong. One of my pumpkins was slowly rotting. I happened to actually touch it today, and it was a little... squishy.... 
Checked the others, so far so good.
And THANKFULLY it wasn't one of my stemmed beauties. 
So I carved me a pumpkin last night, and did a full blown still life..
And I fixed the photography problem!
Lower ISO's for the win!

Image by Strublay 

Image by Strublay


Image by Strublay


Image by Strublay


Image by Strublay

This is the first part of the still life, I'm saving some of the rest.
I hope you enjoy!

Sunday, September 26, 2010

To the Haunt-Cast Audience, and ShellHawk Rocks.

My versions of witch jars were featured on the last HauntCast (Oh My Ghouls!) By Madam ShellHawk. I should have been listening to this for a long time... ah well, yet another thing I wish I knew before I started Haunting Eh?

You know: I play with fire, and I use honest to goodness tea-lights in my little witch jars. Then again I always use actual candles, which has gotten me in trouble more than once. But to be honest I deserved it. THUS!

I, Strublay, am not responsible for your burnt hair, costume, fur (damn werewolves... and and... other anthropomorphic animals of a furry nature making witch jars and playing with fire...), pets fur, house, condo, coffin, or mausoleum if you decide to ignore my statement above, or any of ShellHawks warnings on HauntCast while deploying your witch jars. If your stupid and burn things up, its your own fault! 

I love to see creative Ideas when it comes to simple projects like this, so if you make some awesome witch jars, please let me know!


Here the links to the posts about my Version of Rot's Witch Jars:

The still life session that started me off
The how-to tips page

REMEMBER: My version of witch jars are not rainproof. White glue is not rated for glass so it will come off if hit with water... it adds tot he grungy unwashed look but it really sucks when you've got them "Just so."

Hey ShellHawk: You seriously rock. Thank you for the shout out madam! 
*Thinks about doing a post on her ceramics and bloggy blog*
Ah well until then: 


Now back to the.... well... you'll see.
I'll be doing a post later tonight when I get tired of fussing over my newest project.
Until then.
*Hits play again on HauntCast to listen to the rest of it, goes back to the torture chamber/diningroom*

Wednesday, September 08, 2010

Thing to remember

Witch Jars are not waterproof. 
We had a rainstorm, in Vegas, and my witch jars got water damaged. 
Thank YOU bipolar, random, unpredictable weather patterns. *sigh* Global Warming/Global Weirding strikes again... 

Monday, September 06, 2010

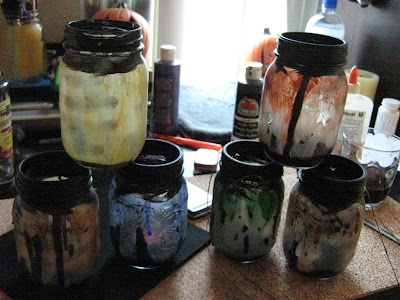
Strublay Style Witch Jars tips.


I really think its awesome that someone else is gong to use my idea to use colored glue on their witch jars, so I just wanted to put out a few notes on the idea. These are lessons I've learned from doing this with my Witch Jars, and I figure that the more I tell you, the better the idea will work for you. 


I'd like to state again that I did not come up with the idea known as the witch jar, that awesomeness I rightfully attribute to Pumpkin Rot. 

Found on Pumpkin Rot's Blog, Image By Rot. 

I'm using pint Mason Jars that come 12 for $6 from Walmart, when working with these little guys I figured that color is a good substitute for size. Once frosted they give off a huge amount of light and look awfully nasty.

This image, and all images below by Strublay.

To color the glue I use tube Water Color Pigments like these that I picked up at Walmart a few months ago: I haven't tried using acrylics yet, but I bet you could use them in the glue just fine. Don't use Cake Watercolor pigment. 
I use White Glue/Glue All, not school glue, from what I can tell School Glue will flake off way too easily. While White Glue is not technically formulated to stick to glass, it does a heck of a job of it anyway. 

You can use what ever colors of craft paint you want for the top or the insides, but I went with flat black, because I wanted it too look like the glass had been coated in sealing resins to prevent water from getting in, or out. Furthermore, flat black paint is my goto for everything aged. 

When it comes to the brushes you use, make them ones you don't care about as the glue will ruin them.

Opacity matters, if you use a 1:1 ratio of glue to pigment, then the opacity of your final effect will be too much, as I show you below in an example. Here I mixed 1 part Yellow Ochre pigment with one part glue, and as you can see it comes out really really opaque. >>>

HOWEVER, with colors like Blue or green, or other dark colors the "advertised" color and the actual color will differ, don't freak out if your color looks too dark, when the glue dries it will dry relatively clear and the light will shine through just fine. 

Less is always more, better to work up the color in layers than going crazy and messing up the effect. Randomness denotes authenticity, don't put an even coat on to your Jar, go crazy, hitting it from different angles, stippling it, rubbing or scratching it off, the more beat up it looks the better.

For the record, Never, EVER add even the smallest amount of black pigment to your glue unless you want your glue black. The black pigment will mess up a color in a millisecond. 

Furthermore if you get it all done and dried, and do not like the results, you can wash it off and start over. Saving grace, I'm telling you.

For the side dribbles that I LOVE to do, go crazy with the color, dark is good. 

Then use the pigmented glue to add to the color near the top and slop it all up. it makes the drips look a bit more realistic. 

If you want to add more texture to your glue layers, take fine dust, ground up black chalk, strands of hair, strands of fur and stick them in the glue before it dries. I use an old blusher brush for the dust. I also get my hands covered in black pastel and grab the jar after its dried. 


I like to wrap the mouth of the jar where the threads are with hemp chord, to do this all you need to do is put glue on the threads, and keep the hemp tight as you wind it around. Occasionally soak the damn thing in glue as it will dry fast. I then paint it with black paint, and seal it again with glue.


I hope that any of this helps, and I'd love to see pictures of your Jars!